Friday, 25 September 2015

15 creative ideas for using vintage trims, ribbons, fabric scraps and haberdashery items

I have been selling vintage trim in my online shop for about five years now. I often wonder what creative projects people use the trim for. So I decide to put together a list of inspiration and ideas for utilising trim, ribbon, fabric strips and other haberdashery items. Some designs come directly from customer emails and the appreciation photos they send me. Some are my own sewing projects and the rest I have found via my travels around the web. I also have a vintage trim projects and inspiration board over on Pinterest. There you will find even more ideas to get your creative thoughts flowing…
15 creative ideas for using vintage trims, ribbons, fabric scraps and haberdashery items
1) Bookmark for a journal, diary or sketchbook
I put together this tutorial on my blog a few months ago for a handmade bookmark or strap to use on your journal/notebook. This book strap is pretty to look at, simple to create and useful. The perfect way to personalise your books, journal or a sketchbook. I’ve used a piece of my vintage woven fabric trim in mustard yellow and sage green to make the bookmark in this photo
tutorial for vintage trim or ribbon bookmark
2) Embellish skirts and aprons
You could try adding vintage trim to skirts, tunics, patch pockets and aprons to name but a few. There are lots of examples out there, but I love this beautiful girl’s skirt via Hanna Purzel’s blog. You can also see more of her sewing projects over on Pinterest.
You could try adding vintage trim to skirts, tunics, patch pockets and aprons to name but a few Hanna Purzel
3) Embroidery Hoop Wall Art
I love embroidery hoop art. I know the trend has been running for quite a while now, but it doesn’t seem to be falling out of favour just yet. The great thing there is no limit to what you can add to an embroidery hoop. So grab some ric rac, ribbon, vintage trim, buttons and get to work with various embroidery stitches to create your own piece of unique textile art. This hoop from Little Bit Funkygives you a taste of what can be achieved.
Embroidery Hoop Wall Art Little Bit Funky
I also love the hoop made with vintage fabric from Henhouse Homemade’s blog. Again, a mixture of fabric, vintage linens and trim would make a great patchwork hoop.
embroidery hoop textile art Henhouse Homemade vintage fabric
I’ve also spotted a book entitled “Hoop-La! 100 Things to do with Embroidery Hoops”. It’s high on my wish-list for books I’d like to own. Take a look at the Youtube video advertising the book to get a taste of what’s inside and to inspire you further.
4) Vintage trim belts
Using trim on a handmade belt is a great way to add a retro twist to your outfit. Perfect for adults and children. Take a look at this tutorial from Sew Very for reversible trim fabric belts. This idea is definitely on my to-do list…
sewing tutorial for handmade vintage trim belt from Sew Very
5) Dog collars and leads
In a similar vein to belts, narrower trim can also be used to make DIY Dog collars and leads. Again there are lots of tutorials out there, here are a few of my favorites: Think Crafts, Totally Stitchin and Dog Paw Print.
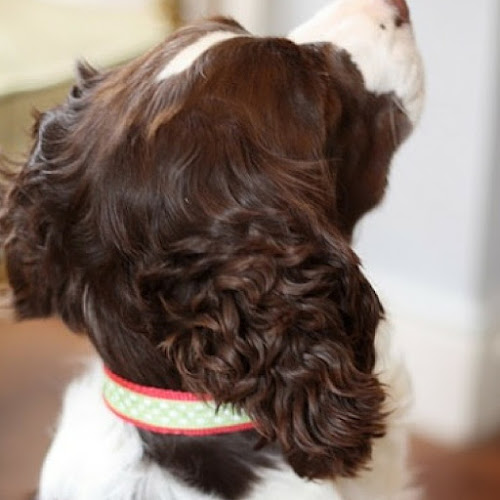
tutorial for DIY handmade dog collar from Think Crafts
6) Upcycled painted key necklaces or decoration.
This is another favourite of mine. Love the idea of combining old keys and vintage trim or ribbons to make an interesting display in your home. I would probably create quite a few to hang from hooks on a piece of driftwood. You could mix any combination of trim and key colours or you could stick to a certain theme to fit in with your home’s colour scheme. Take a look at Maize Hutton’s blog for further ideas.
DIY painted keys from Maize Hutton upcycle jewellery trim ribbon
Alternatively you can wear the keys as an interesting piece of upcycled jewellery. Take a look at Jessica in Your Ear’s blog post for more inspiration. Again the combinations of trim and key colour are endless.
upcycled painted key jewellery from Jessica in Your Ear
7) Adding detail to a bandana
A simple way to add extra detail to a bandana or headscarf is to stitch some vintage trim or ribbon around the seam. I made this bandana for my daughter and added the trim to make a tie. There are lots of bandana tutorials out there, such as this one from Straight Grain and then adapt it with trim or ribbon of your own choice. Great for small children, bandanas tend to stay on a bit better than traditional sun hats. Also perfect for adults to give your outfit a folksy, festival vibe.
adding vintage trim to child's bandana folk festival sewing handmade
8) Crazy Quilts
I don’t really claim to be much of an expert on quilting. But apparently there is such a thing as Crazy Quilts and quite frankly I love them. This is a definition taken from crazy quilts on wikipedia.org:
“Crazy quilts differ from "regular" quilts in other ways as well. Because the careful geometric design of a quilt block is much less important in crazy quilts, the quilters are able to employ much smaller and more irregularly shaped pieces of fabric. In comparison to standard quilts, crazy quilts are far more likely to use exotic pieces of fabric, such as velvet, satin, tulle, or silk, and embellishments such as buttons, lace, ribbons, beads, or embroidery. Crazy quilting as a textile art is extremely creative and free-flowing by nature…”
Debra Dorgan All Things Pretty crazy quilt textile art mixed media art
Some of my favourite examples come from Debra Dorgan, the creative mind behind All Things Pretty. I love the way she combines fabric and trim to create a riot of colour and texture. There are some beautiful examples over on Allie’s In Stitches blog. You can also visit indulgy.com to see a beautiful photo of a selection of stitches used in Crazy Quilting.
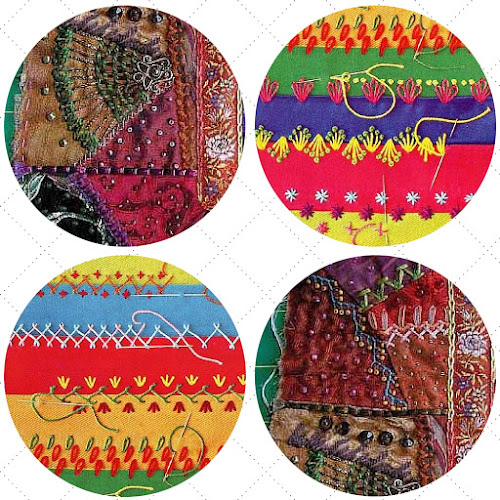
crazy quilt stitches Allie's in Stitches blog trim, ribbon, fabric, textile art
9) Add vintage detail to a cylinder lampshade
I have found through customer emails that one of the most popular uses for vintage trim is to use it to add retro detail to a lampshade. Take a look at this tutorial from Beach Vintage. It shows you a step-by-step guide to recovering a cylinder lampshade with fabric and trim. Just looking at it makes me want to grab a glue-gun and make a heap of lampshades for my home.
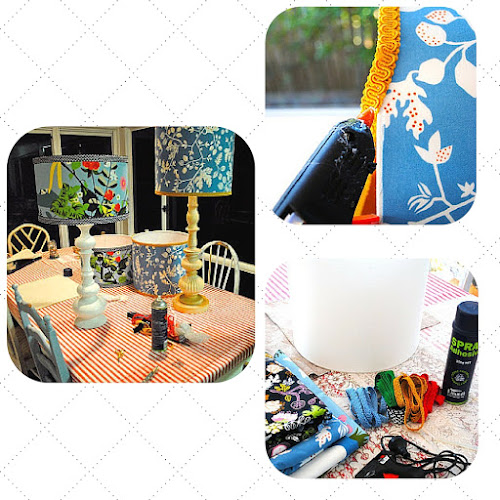
repuposing, recovering, upcycling cylinder lampshade Beach Vintage tutorial blog
10) Create a naked or skeleton lampshade
Another take on the lampshade idea is to create a skeleton or naked shade. Quirky and unique, you can combine just about any fabric or ribbon for this project. The sky is the limit. There are some great examples out there, many use fabric scraps, but you could make one with a combination of fabric and trim.
Pursewna Pursewna creates a different twist on the naked lampshade by tying the fabric across the frame rather than wrapping it. Her original inspiration came from The Pleated Poppy. It’s worth taking a look at both blogs to get more ideas. The naked lampshades featured here are clockwise from top left: Dottie Angel; The Pleated Poppy; lystadsvingen.blogspot.com; Pursewna Pursewna
fabric covered naked or skeleton lampshades, upcycle, fabric, ribbon, trim
11) Ribbon hoop mobile decoration or garland
I’ve seen a few of these over the past few months and I think they would look great with a mixture of ribbon, fabric and vintage trim.
You can either make a mobile version using a hoop to hang from the ceiling. If you take a look at my vintage trim Pinterest board you can see people make many versions of hoops and wall hangings for children’s rooms, parties, weddings and the classroom. I think they are pretty, tactile and colourful. This is another project high on my to-do list. Take a look at this tutorial for a hoop mobile over on Shannon Berry’s blog. There are lots of wedding decoration ideas out there, try Brit + Co and A Low Country Wedding to see some pretty examples using ribbon, trim and fabric strips.
trim or ribbon hoop, garland, tutorial blog, wedding decoration ideas
Another twist on the hoop idea is to create a garland. There is a great tutorial over on The Scrap Shoppe blog using fabric strips. I think it would be interesting to add trim and ribbon into the mix. This is a lovely no-sew project, so could easily get children involved with making one.
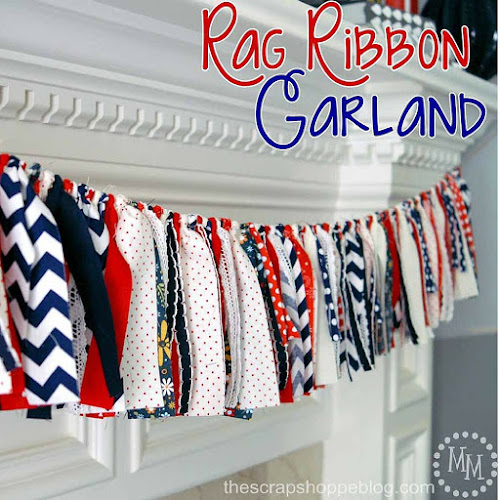
Rag Ribbon Garland from the Scrap Shoppe tutorial blog
12) Fairy Lights
I first saw fairy light like this on a stall at Lou Lou’s Vintage Fair in Bristol a few months ago. I was peering at the lights and realised they were made with covered plastic shot glasses with fairy lights threaded through. There are oodles of tutorials out there. The top two photos in the image below are from Ruususuu and use paper cups. There are more ideas over on itsamakkie.blogspot.co.uk and rebeccasdiy.blogspot.co.uk. You can combine vintage fabric on the shades and then add trim or ricrac along the edges. Again the combinations are endless and they look amazing hanging from a fireplace or bookshelf.
tutorial paper cup fairy lights from Ruususuu and Rebecca's DIY blog
13) Christmas Stockings
A friend of mine gave me a lovely collection of vintage trims a couple of years ago. I had been waiting for inspiration to come to me and I hit on the idea of making felt Christmas stockings with trim detailing. They are simple, but effective and the trim is so festive. I'm really pleased with the way they've turned out.
handmade felt christmas stocking with vintage trim detail from Pouch Vintage
14) Fabric, yarn and ribbon wreaths
Yarn wreaths have become incredibly popular recently. Alongside yarn, wreaths can be made with vintage fabrics, ribbon and trims. Katie Runnels, the creative mind behind The Constant Gatherer makes some of the best examples I’ve seen.
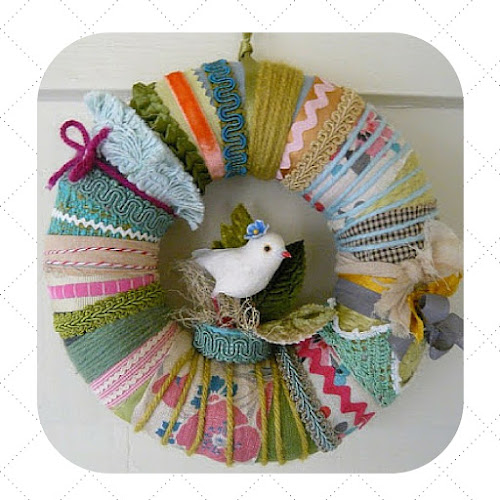
fabric, yarn and ribbon wreaths The Constant Gatherer Katie Runnels handmade
There are heaps of wreath tutorials out there. I’m particularly in love with this vintage fabric sheet version from In Colour Order. It would be nice to add some vintage trim or ribbon into the mix to add extra retro detail.
tutorial for vintage fabric handmade wreath from In Colour Order blog
15) Embellish a bag or purse
I’m a big fan of bags, especially totes. So a tote combined with vintage trim ticks lots of boxes for me. It’s no wonder I fell in love with this bag featured on the Lola Nova blog. Grab the Carryall Bag pattern from Fabenmix and add your own modification and embellishments.
15 creative ideas for using trims, ribbons, fabric scraps and haberdashery items, embellish a bag or purse Lola Nova and Fabenmix
Another lovely example is this purse from Karen Meyers made from a repurposed wool jumper with vintage trim detailing. It is featured on the Grains of Earth blog post – 18 ways to upcycle old sweaters.
15 creative ideas for using trims, ribbons, fabric scraps and haberdashery items, embellish a bag or purse Karen Meyers Grains of Earth blog
Follow Pouch's board vintage trim projects & inspiration on Pinterest.
I hope you have enjoyed my list of creative ideas and uses for using trims, ribbons, fabric scraps and haberdashery gubbins. Please head on over to my Pinterest board for further inspiration. The projects included in this blog post are for personal crafting use. Please do not employ for commercial use unless the specific tutorial gives permission for this. I have made a great deal of effort to credit all the designs featured here. If you share this post, please take the time to credit their hard work. Thank you & happy crafting!
I'm linking up with The List over on youbabymemummy.com

You Baby Me Mummy


Tuesday, 22 September 2015

Autumn Issue of the UK Handmade Magazine is out now

The Autumn Issue of the UK Handmade Magazine is out now.

It features my interview with EJ the creative mind behind Hatchet + Bear.

Hatchet + Bear create a beautiful selection of handcrafted wooden utensils and objects for the home. Run by EJ, a woodworker with a background in arboriculture, she is perfectly placed to understand the visceral pleasure of crafting with wood. EJ’s work blends traditional methods, simple hand tools and locally foraged timbers to create pieces that have a timeless quality. Alongside her range of products, EJ runs regular spoon making workshops, many of which combine camping, cooking and carving. We caught up with EJ to find out more about her influences and what the future holds for her business.

I found EJ to be an incredibly interesting interviewee. I particularly like the way she felt compelled to follow her creativity which she had neglected for many years. She explains how unfulfilling her work was and the decision she made to turn her life around:

“I was not listening to or taking my creativity very seriously at all. Eventually, I came to my senses - I felt unsatisfied. Actually, I felt ill. Over time, I had amassed a jumble of design ideas and design opinions in my head, that I thought were amazing and yet I wasn't doing anything about them. I have always loved trees and being in the woods, so I went on to study Arboriculture with the Royal Forestry Society. I then went on to do an Art and Design Foundation at Trowbridge College - which was brilliant. I was on a roll so I studied further, in Product and Furniture Design at Kingston University, which taught me alot - including what kind of designer I did not want to be. I left university and tried my hand at a few traditional and heritage crafts. Green Woodworking was the one that really got me. I merged everything together, and here I am”.

Alongside Hatchet + Bear, the magazine also features Amanda J Simmons, Serena Smith, Dazzle @ Dovecot, Handmade at Kew and much, much more...

Head on over to our website to read the magazine online.

Friday, 11 September 2015

September on the allotment: super sunflowers and losing the battle against the weeds

September on the allotment: super sunflowers and losing the battle against the weeds
Alongside vegetables and fruit crops, many people like to grow flowers on their allotment. Cut flowers from the supermarket can be expensive & often flown halfway around the world. It's nice to be able to cut a few flowers to take them home with your veg. My Mum had the great idea of growing a row of sunflowers on our plot so that we could cut them to have in a vase at home.
giant sunflowers on our allotment plot
However, it didn't turn out quite as planned, we have had a couple small enough to put in a vase, but most of the sunflowers have grown to a massive size. The seed packet didn't say they were giant sunflowers, in fact the actual plants are pretty short, about hip-height, but the flower heads are huge!
It doesn't matter that we haven't been able to take many home to put in a vase because the bees have loved them. Vegetable crops can survive without pollinators, so we've been more than happy to see bees all over the sunflowers. Also, if you leave sunflower heads to dry, birds like to eat the seeds too. Spot the bee in the photo below!
giant sunflowers and pollinating bees
Whatever the size, I love sunflowers. You can't help being cheered up by their sunny yellow petals. I also love the intricate pattern of the seeds in the flower head.
intricate pattern of seeds on a giant sunflower head
a row of sunflowers to cut and put in a vase at home
beautiful sunflowers on our allotment plot
My Mum seems to think the sunflowers have grown so huge due to the volcanic ash she put into the soil last year. Whatever it is, the flowers and the vegetables have done well. But, so have the weeds. I always say that as long as we are getting more vegetables than weeds, then we're ok, but we're on the verge of losing the battle. This Summer has been really wet with burst of warm sunshine inbetween the downpours. Not great for camping or picnics in the Summer holidays, but the plants have loved it. We only need to turn our backs for a few days on our allotment plot and the weeds become rampant.
I think we need to have a major weeding session soon and then cover the unused parts of the plot for Winter. We do still have parsnips, purple sprouting and kale growing and they will stay in over the colder months. I can't wait to try my first ever home-grown parsnips, even if some of them look like curly ram's horns...which will make for an interesting time when I peel them.
sunny sunflowers from our allotment plot

I'm linking up with Country Kids over on www.coombemill.com, Whatever the Weather over on www.lifeunexpected.co.uk and monkeyandmouse.co.uk, Point + Shoot over on youbabymemummy.com and www.snowingindoors.com, Image of the Week #IOTW over on www.trulymadlykids.co.uk and Let Kids be Kids over on letkidsbekids.co.uk.

I'm also linking up with How Does Your Garden Grow over on the beautiful mammasaurus.co.uk

Mammasaurus

Sunday, 6 September 2015

A new project: rabbit applique hoops handmade with vintage fabric

I've been making my lavender-filled, vintage fabric rabbits for nearly six years now. Alongside my handmade sleepy owls, they have proved to be one of my biggest selling items. I have had many customers buy more than one because 'they can't decide on the colour' and many have come back to buy more for friends and family as gifts.

I use a particular type of thick vintage fabric and I have amassed a selection of colours over the past few years. I find this particular fabric features colours that really pop and they rarely fade. People seem to love these vibrant colourways, I'm a big fan of them too, in fact I have about six or seven lavender rabbits dotted around our home.

I decided a little while ago that I would attempt to make an applique version of the rabbit motif. I knew I would need to adapt the shape slightly because the template I currently use is wider due to seam allowances. After a bit of sketching I created a new template. Once the main body of the rabbit was cut out I attached the rest of the felt detailing and eyes. With the help of a bit of Bondaweb I attached the rabbit to some calico and started the applique process. I have used a combination of back stitch and blanket stitch. I adore blanket stitch and it has always been an important part of the lavender-filled design.

I have to say I am really pleased with the results. I put a photo of the finished item on my Pouch Vintage Facebook page and was pleasantly surprised by the positive response. I think I may try and sew a few ready to go into my online shop in time for Christmas. I'm currently putting together another rabbit-hoop in a different colourway. I will post photos once I have finished it...

LinkWithin

Related Posts with Thumbnails